Monday, August 31, 2009

Creative Team Focus

I love Bank Holiday Mondays, as it is not often I get a extra day off, the only thing being that I never can remember what day Tuesday is, and then spend the whole week thinking I have another day! Today is going to be spent clearing and tidying the rest of my studio after our major rehaul last week, or was it the week before? lol, my memory is so bad these days! Must be the hormones!! I then will have all my inks and stamps and stash all neatly in place. I wonder how long that will last?
So the only piece of art I have to show you is one from Susan , another member of my great and innovative Creative Design Team. Do pop over and say hi to her.
Would you like to become a member of our Creative Design Team. Do you blog and have time to create for us? We are happy to see applications from all over the world, the more the merrier!
Have a great Monday wherever you are
Hugs

Sunday, August 30, 2009

My first Christmas Card!

I know it is early but I just wanted to play with the Mini Christmas plates, and the new Stitches plate. I used Grungepaper to stamp on, and distress inks to colour. The card is just inked with Old Paper and edged with Fired Brick Distress inks. I did spritz it to create a vintage look. I stamped the Christmas images onto the Grungepaper ( smooth side) after using Fired Brick to colour the grey paper. I then stamped onto the Grungepaper with Archival ink, and used the stitches zigzag to edge the image. I had planned to add the stitches after I had cut out all the pieces, but the difference in thickness of the grungepaper once glued down made it impossible to get a good stamp. So I re-glued the images onto another card, and just used them as they were.
Have a great Sunday

Saturday, August 29, 2009

Christmas comes early...

I have never been one for making or even thinking about Christmas earlier than the first week in December, but in the crafting world, everyone releases Christmas around July, and here at The Artistic Stamper we are no exception! There are 2 NEW plates of mini Christmas now released on the website. I love these as they are favourite stamps but so much smaller! They all fit into a mini plate approximately 12cm x 7 cm . Just tiny! perfect for ATC's or in my case mini cards. This weekend there is FREE postage and packing and spend over £30 and you get free postage AND 10% off too!
I am going to try to declutter my workshop today, and make some art! I feel Christmas coming on..lol
Happy Creating!

Wednesday, August 26, 2009

Splatter here, splatter there..

Yesterday Hels came to visit, and amongst doing other bits we had a little play with some of the new colours of alcohol inks. Now a while ago, my DH bought a compressor , which he said he NEEDED! At the time, I wasn't sure and wondered apart from using it as an automatic nail and staple gun, really was it useful? Well I found a use for it, when he was blowing out my computer after we had refurbed my studio, it suddenly occurred to me that it would be fabulous for the splatter technique using alcohol inks, and it worked a treat! I have done some step by step photos for you , which are more or less self explanatory. You can use one of those air cans for cleaning out the computer if you don't have access to a compressor!!! They work brilliantly , and in fact the compressor has a little too big a nozzle, but the effect is more or less the same.
Drop a couple or more drops of alcohol ink onto the glossy card, and immediately blow or spray the air can onto it. It spreads amazingly and dries almost immediately. We used several colours for the multi coloured one, and obviously different shades of blue for the other one. It is a messy but fun technique, and for best use , absolutely use a non stick craft mat underneath the card to catch the overspill.


We added some of the new Tim Holtz stamps to the backgrounds, and my samples are just simple cards. Check out what Hels has done too.. her's are much better than mine!
Happy Splattering!

Tuesday, August 25, 2009

A peek inside my Drawers!

I wrote and edited this post, went to preview it and all the writing had disappeared! No idea what happened there! Blogger on the blink? Anyways have a peek inside my world :) This pic is the computer area before: This is after: Yesterday Mal finished my final worktop for making art on, and then decided to varnish it, which takes 24 hours to dry! so no art today in my new area.. patience is not a virtue of mine! propped these two on her for the pic of the work surface:So if you are interested here are pics of my new drawers of the wooden and wire kind in my studio/workshop. We found all the components in Ikea on sale, the drawers were a bargain at a fiver each, apart from the little one with compartments and the baskets, but the top and sides were a bargain too. He is so clever just putting it all together with not a lot of help from Klutzy me, who managed to drop herself down the stairs and drop everything else in sight too! I have filled them up and I am sure that the surfaces will get cluttered again very soon, with more going in the drawers as I find all the stash which was put in boxes while the work was being done. All I need now is inspiration! A BIG thank you to Mal, for being such a star for creating such a great area for me to clutter up again!
I have a little idea in my head for publication tomorrow.. so watch this space!
Happy Creating

Monday, August 24, 2009

A Little Interlude

Over the weekend, we stripped out my studio workshop, well part of it to redo the work surfaces, and provide me with a better area to create in. Oh how I missed my computer, now installed on a new desk, and we put in a whole customised set of drawers too. The work bench is going in tonight! Yah! So tomorrow when the light is better and all the bits and bobs are in the drawers I will show you the finished area. It is strange when stuff is removed or changed, you get a different concept. For example the computer screen is now on the wall, and the chair is too low :(, so new chair needed! Sat on a cushion right now typing! Also had to make the words on the screen bigger so I can see them.. oooh I feel old age creeping up! I also missed my inks and stamps and there was nowhere to create, so roll on tomorrow so I can play!
In the meantime, here are a couple of pics of where we went on our holiday in The Black Mountains in Monmouthshire. I loved the place, even though I do prefer to be nearer the sea, but it was quiet and hilly, and very very green! This was the view from my friend's cottage

I have so many pics, but this one tickled me as Mal managed to get a sheep hidden in greenery.... Finally today if you are still thinking of applying for our Creative Team, here is Susan's blog, another one of my Fab team! Go say hi to her...

Hugs to all

Friday, August 21, 2009

Creative Team call out!

Have you got a better way of saying I am looking for STAMPERS who like to make ART? If you think you have got what it makes to join us at THE ARTISTIC STAMPER and be on our CREATIVE TEAM, then email me a little bio, with a link to your ART.
In the meantime Lucy, one of our team, has started a blog here. Do go and say hello, she would love it!
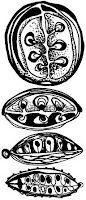
I have just uploaded on the website some new stamps from Karantha these are fab , pods and flowers and seeds, very versatile, and a great price.


I have made a rainbow card from the seeds and flowers stamps. This is my entry for the Gingersnaps Rainbow Colour Challenge
I used inks that haven't seen the light of day for years and which worked perfectly- Colorbox. I brayered the background with Florist which is multicoloured, and then direct to the stampbord, I used Topaz, Sky Blue, and Old Rose. I had forgotten how wonderful these inks were, and I got an ENTIRE set years ago in 1992 when I co-wrote a book on rubber Stamping called Discover Rubber Stamping.
I put all the stampbord together and then stamped the flowers and Seeds with Archival black, dried off with a heat gun, and then spaced them out equally on the card. I did learn one thing while using these inks with Stampbord. Even though I heat dried them , and then stamped on top with Archival, I hadn't heat dried enough and I made a mistake, so I washed! the stampbord under water and the inks came off! Re-usable stampbord! I then more carefully heat dried them before stamping on top. I think if the piece was going to be handled, I would clear emboss or cover with Glossy Accents.

Hopefully it will fulfill the challenge :)
Happy Creating

Thursday, August 20, 2009

Rain, rain go away...

While we were away at the end of last month, I took with me a rather large lot of crafting goodies, in the vain hope I might create! I had more crafting stuff with me than clothes! I am such a morning person, that very early every morning, while Mal slept in, I worked on my journal or sketched a little or created a little bit of art. I took a couple of canvases with me, and some grungeboard, and this piece came to me while it rained and it rained and it rained! I thought as Lots to Do challenge was a free one this week, I would enter it for that.I used Claudine's Studio paints in blue mixed with Studio Multi Medium Matte to prime the canvas, and then using my ever so faithful glossy accents, added letters all over the canvas to spell out the words " Rain, rain go away come again another day". Where does this quote come from?I used the letters from the Nature grungeboard , distress inking them in yellows, blues and greens. I also added a couple of butterfly accents. I dropped blue paint also over the canvas to simulate the raindrops that seem ever so large on the border of Wales! The canvas is tiny too, just a mere 3 x 5" big.
May the sun shine wherever you are today :)
Hugs

Wednesday, August 19, 2009

Ring a ring of Roses...

I thought this an apt title, as this art is a grungepaper rose ring! The idea came to me while I was making roses , and I used the smaller flower from The Artistic Stamper Flower Power set, and grungepaper, of course, and distress inks, 'cos they love the grungepaper, and to make it glitz, Stickles from Ranger! Make the rose as in my previous instructions here

I used Faded Jeans and Mustard Seed distress ink for the colour, and then stamped over with the Dots background. Glue all the pieces together and cut off all the bases of each flower element first before gluing, so they sit flat on the ringbase. Once it was glued together I stickled it all over , first with Crystal stickles, I then glued it solidly onto the ring base and then I thought it needed lifting a little so used Dark Blue to accent the edges. The dotty background is on both sides and shows very subtly through all the glitz. The pictures really don't do it justice.. need a professional photographer! I then finished it off with a smear of the dark blue round the glue at the base to cover up the glue that was showing.
I do hope you like....
Happy Creating!

Monday, August 17, 2009

Blue Monday

Over on Hels' blog there is a challenge called Sunday Stampers. This week the theme is Blue Monday, and when I was away on holiday, I took a little (actually rather a lot!) of crafting stuff with me.
I made a blue canvas while I was there, so thought that would be perfect for this challenge.
I covered the 8 x 8 canvas in a music sheet from a pack of Vintage paper Ephemera, and used Claudine's studio multi medium matte mixed with a little sky blue paint.
I also took Ten Seconds Studio Kabuka moulds with me plus my big shot to use with them. All went fine, until I realised I really didn't have the right bits to use them through the machine. But I persevered, and eventually I managed to make a few pieces. I cut the Dijon metal to size first and then ran it through the big shot, which by the way I am replacing with a cuttlebug, as soon as I have time to buy one!!! This picture was taken in my window with the sun streaming through the net curtain.. thought it looked quite good :)
I coloured all the pieces of metal with blue alcohol inks, using a variety of colours (I even took them with me too!) . I then added a smoosh of Smidge of Blue from Claudine's Studio paints to some of them (took them as well!!!) After this I lightly sanded them. Then I stuck them down with double sided tape.
I love the middle piece. It didn't photograph very well, but has a kind of shine that is ethereal to it. This piece is really a work in progress, as I have to admit I didn't finish the sides as the Big shot really wasn't playing the game! grrrr
Thank you Hels for the challenge.

Saturday, August 15, 2009

What a lovely bunch... & a Creative Design Team Call

I hope you are enjoying your weekend. Down here in the south East of the UK, it has been and still is lovely and warm and sunny, much to the chagrin of my daughter who is in Edinburgh, where it has been very wet, so much so that she has had to buy new shoes that were dry!!!
I have spent some of the day making grungepaper roses or in my case flowers, as they look nothing like roses with our new stamps :). They are so messy and addictive to make. Hands now covered in inks and glue..mmmmm!
I do have a post from a few weeks ago showing you how to make them here.
I wanted to make several for a bunch, so used some of the new background stamps, and the Flower Power set. added leaves and thick wire for the stems, and lots of Glossy Accents as glue.

Here at The Artistic Stamper we are looking for new Creative Team members, and this is a call out to everyone who loves using stamps to create art. If you would like to be considered please email me, with a link to your blog or just attach jpegs of your current art. A little bio would be good too. We are not looking for any specifics, just enthusiastic, fun loving stampers! We are accepting applications from all over the world until Sunday 6th September. No experience is necessary, no past publication is necessary, just simple enthusiasm and of course a great love of stamping!
Looking forward to hearing from you, yes that is you reading this blog.. go on send me your art and become a Creative Team member!