 It is amazing how the alcohol inks always seem to blend with the stamps , even if you think it looks awful when you have done it. Just try stamping on top of it!
 It is amazing how the alcohol inks always seem to blend with the stamps , even if you think it looks awful when you have done it. Just try stamping on top of it!

 I did make 2 versions, and one s fatter and shorter than the other. Of course you could use beads rather than the canvas, or paper or almost anything you like. My photos are rather rubbish, but you get the idea.
A Claudine, Leandra (she is the inventor of Leandra beads) bead with a twist! Maybe a technique called the CLJ... mind you sounds a bit pretentious.....Have absolutely no idea if this has been done anywhere else, but I love the idea of adding the bedazzles,or any other component and when I get my meltpot out again I will be making more and and trying to refine it too. Would love to hear what you think,
 I used an old dressmaking pattern on the front, ( luck would have it , the pattern said Front View) and covered it in a mixture of Claudine's Studio Multi Medium Matte and traditional tan paint ( how did I live without this colour before!) . I had some gorgeous paper ribbon and old lace picked up from my favourite shop, Heselden Hats this week, which I glued down the spine, and around the edges. I then stamped one of the new Stitchels stamps in Fired Brick Distress ink onto Claudine's sticky back canvas, and cut them out. I just love this new stamp, it stamps just as it looks.
 The distress ink gave a worn look to the flowers. I wasn't sure what to do with the corner of the book, where the sleeve part of the pattern had a rounded edge, so I cut the cover off ! Then I put a cracked texture mat from Carolines also stamped in fired brick behind it, and covered the inside of the cover with more canvas inked in fired brick, and stamped the Stitchels stamp in tattered rose distress ink and covered the join in the paper ribbon. The " perfectly fitted " stamp from the Ephemera plate finished it off.
Finally I used clear buttons ( this is a technique I found on a blog last week, unfortunately I did not bookmark it) and stuck old dictionary pages behind them with Glossy Accents, cut out, and used pink wire through the holes as thread. I used the words, button and altered, and some of the paper ribbon. I then peeled off the backing and folded them over the cut corner, and down the edge of the spine.
 I was rather pleased with the whole effect, and although I haven't shown you I discovered a wonderful technique while making this book.. I have left that for tomorrow.

 If you would like to know about our special offers or our new products ( we are continually adding them!) then sign up for our newsletter ( sign up box top left hand corner of the blog). We have almost all of the Ranger products, stamps, Kling-On, and loads of accessories. Finally for today another birthday card I made this week ( I was quite productive!) This one was for a dear friend of mine, Wendy. I used the melpot, of course, and some random papers,a Tim Holtz stamp, and a little charm I bought ages ago, which i put into the mould while it was still wet. I then superglued a brooch pin to the back and attached it to the card. A brush of Perfect Pearls, a spritz of water on the leaves and it was done!


Off to play with the new stamps, have a good day, the sun is shining here!

 Aptly named Embrace Imperfection ( also one of Tim's stamps), I was rather pleased with the finished hanging.

 I think my DH liked it also, ( well let's put it this way, he wouldn't tell me otherwise, would he?)
 When I liked how it looked, I covered it in gloss Multi Medium, and stamped one of The Artistic Stamper Gibson Girls on top.
  Add it to the frame with a piece of glass. For the embellishment, I stickled the half numbers from the Idea-ology line, in worn lipstick and faded jeans,
 left it to dry and attached it to the frame.
 The birthday cards I am in the process of making are nothing like the original idea, and as soon as I know they have been sent and received I will show you.
 Firstly I cut a strip of copper to fit the bracelet all the way round. Then I worked it onto the mould , and moved the copper up as the mould wasn't long enough, so I had a strip that I had worked and cajoled over the mould. Does that make sense? You can run the solid moulds through a cuttlebug or big shot, but this mould is hollow, so that wasn't possible this time. I completely forgot to take photographs through the whole process, I was so engrossed in making it!
  Finally the fun and messy part was adding the inks ( without blender ) onto the felt , and colouring the metal on the bracelet. I even coloured the inside using the felt , no handle, as the bangle was turquoise and plastic, and wow, the alcohol inks looked great over it! I have to say, consequently my fingers are now bright raspberry pink!

 If you haven't got any of the new alcohol inks, then they are a MUST, and are all available in stock in the shop. The pens are due in this week too!
 I then used a set of Tim Holtz stamps I bought when I was in the States last month from Michaels, and are exclusive to them. They are tiny versions of his bigger stamps. Love little things! I used the Lost and Found set. All stamped in Archival Black ink. A little Glossy Accents on the numbers, a spinner and sprocket completed the love note and this is being popped into the bag of goodies too!

 Have a scrumptious Bank Holiday Monday ( here in the UK it is May Day holiday) . I am off to garden and help make a compost bin with the OH( probably more help than hindrance!) , so may end up playing with more alcohol inks *lol*... and thank you for looking
 We have several projects in the magazine too showing you how to use the little bird, and there is even a giveaway of a pair of earrings I made! If you haven't got a copy , do go and get one, and have a play with the stamp.
 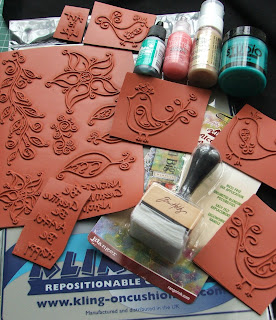 So to win this, all you need to do is add the blog candy to your blog , add a comment, sit back and wait! I shall choose the winner on Sunday May 3rd. Don't worry, I will post anywhere in the world, so please spread the word. I shall keep this post above the others until May 3rd.
Hugs