Showing posts with label dabbers. Show all posts

Tuesday, November 01, 2011

UK Scrappers One Day Blog Hop!- Blog Candy galore!

Hi, and welcome to the UKScrappers forum Sponsors blog hop! If you have come here via UKScrappers, then you should have travelled via Art from The Heart, and you have landed on The Artistic Stamper blog! We are giving away a random prize today of a £20 Voucher for our shop, and if you comment please put your name from UKS on there too, and you will be entered into their prize draw too! If you have never heard of UK Scrappers, now is the time to join!

I have done a mini tutorial using the Shabby Chic technique with Dabbers and embossing powder.

To make this I used one of our gorgeous wooden birds, and started off by painting a dark dabber background on the bird, and letting it dry.


Stamp your favourite stamp ( I used a calligraphic mat) on top using Versamark or an embossing ink pad, and cover with clear embossing powder.

Heat to set. when cool, add several colours of lighter Acrylic Dabbers, and blend with a piece of cut n dry. allow to dry thoroughly.


Finally spritz a clean cloth with water, and gently dab off the paint where the embossing is to reveal the dark background. Always looks stunning!

So, a £20.00 voucher up for grabs, prizes from UKScrappers, and lots of tutorials from lots of great companies! What more could you want? LOL

If you are following the blog hop, your next port of call is Bubbly Scrumptious.
Thank you for visiting, and don't forget to comment... you have to be in it to win it!
Happy Creating!

Saturday, June 18, 2011

Shabby Chic!

Earlier this week, Hels had a birthday, and I always try to make a card for her...but you know that saying... never enough time, but amazingly enough I found time, and I used the technique that I used for the Grungy Monday set of drawers to make a card. Shabby Chic is what it is called, just using Dabbers, clear embossing, and stamps, so simple but so effective!

I know she got the card in time ( good old postal service!)so I can show you
I am running backwards to get out to my class this morning... so love you and leave you
Have a creative Saturday!

Monday, May 30, 2011

Grungy Monday 09

I was absolutely delighted when Linda asked me to be a guest designer alongside Kaz at the Little Shabby Shed for her Grungy Monday Challenge! The criteria is to use one of Mr Holtz's techniques that he has shown over the past few years, and make it your own, or if you prefer follow it to the letter! This week it is
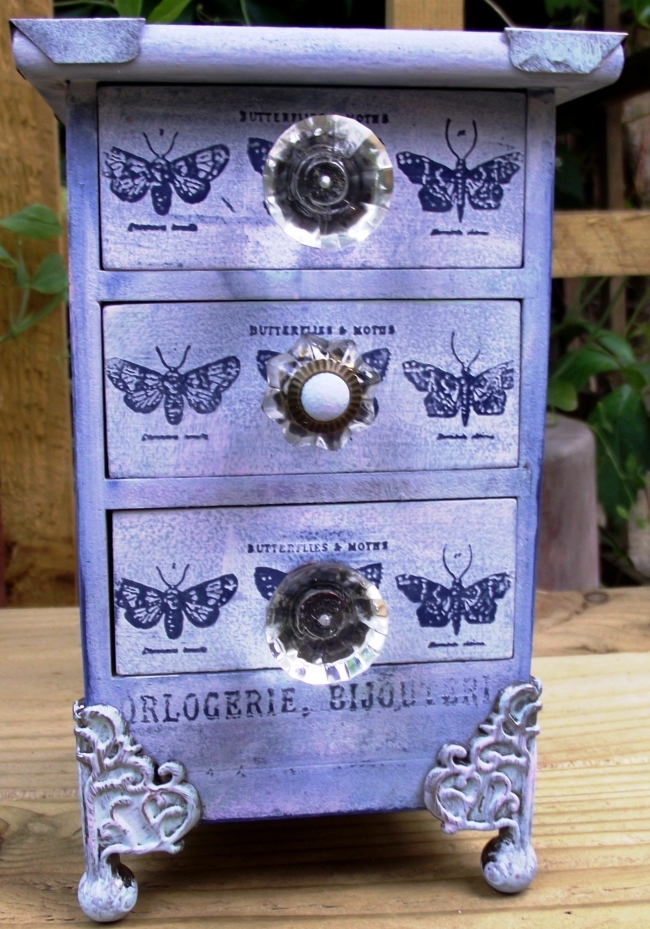
I love this technique, simple, effective, and so shabby chic! Often when doing Linda's challenges, I like to think out of the box, and in this case I thought right in the box, and used a set of drawers found in a charity shop yonks ago, and we altered it , so I could add feet ( that is my DH did! lol)
 I used the technique Tim describes so well in his blog post, add his new Papillon stamps, a set of foundation feet and corners, all covered in Dabbers to shabby chic them! I think I went French on this project! lol The base colour is Denim, covered in Juniper, Cloudy Blue, Shell Pink, and Sherbet. I even covered one of the Curio knobs in dabber too ( ok well a little bit of it!)


If you haven't got the products, improvise, and make the technique your own!
The challenge is open to absolutely everyone, and if you join in, please add your creation to All Things Tim Yahoo Group too, where there is a special folder created by Gloria (list mom) for you to upload your creation!
Love, love this technique, and thank you Linda for the challenge, and for allowing me to be a guest designer. I am truly honoured, and humbled :)
To see Linda's Creation of the week, and Kaz's tooo, pop over to Grungy Monday, and get creating!
 Hugs

Tuesday, December 21, 2010

Let it snow...

I am old enough to remember the snowy winter of 1962-63...oh come on I am not THAT Old!! lol, My Dad made a sledge out of an old tin tray and me and my sisters used it on the hill by our house! This December reminds me of that year , but I am afraid the days of tin trays have long gone! I mean how ridiculous would that be ...me on a tin tray sledging.. ooh YES! a great idea! I think I will find myself a tin tray..rofl!!! In the meantime I have travelled on the trains to North London, seen my Mum (who is on the mend slowly) , and met up with DD in London (boy there were long lines at St Pancras for Eurostar!)  come home to fresh falls of snow, and even had time to make another tag! I have to say on another note to everyone who is snowed in we are still taking orders on the website and everything that goes out this week will be recorded, so we can track it.. doesn't mean you will get it any quicker , just so we can see you have got it! ..eventually....
Here is my tag for the day: ddistress ink background, embossed tag, Stickers from Seasonal Sticker book, and a little snowman charm covered in snow dabber!

Have a creative day !
Keep warm....

Sunday, December 19, 2010

Tag 444! snowbound!

This is tag no 444! OK I am lying..it is only tag 4 of my withdrawal...not sure why as I thought I had done a tag everyday since T!m's gorgeous tags, but seem to be lagging behind! lol The snow heavens opened yesterday here, and we are surrounded by gorgeous white stuff! Sadly I am not able to get to see my Mum who is in hospital, so hoping to get there tomorrow. Mind you the trains are running.. that is in itself a miracle but she has ordered me not to make the trip! Think that was the influence of the morphine... so I have obeyed and been a good girl! For those of you who sent their wishes, thank you it is much appreciated, and there is a long way to go..but all is good at the moment :)
In the meantime while snowbound, I made a little tag. This time I used an embossing folder of the Snowman. I embossed it once on a tag and cut out the snowman in negative, and laid it on top of a distress inked tag, and just used a pearl dabber to make out the snowman before running the inked tag back through the embossing die. Does that make sense? I was going to clear emboss some snowflakes on the tag, but horror! I cannot find my pot of clear embossing powder! Mislaid in the piles of *stuff* filling my studio!! So I dabbered them instead!
Add a sticker from the seasonal sticker pad .. snow has come to my tags!!

 I am entering this in Simon Says Stamp & Show Challenge as well as my own ( not that I can win anything...but it is just fun!)
Keep warm
Hugs
 

Tuesday, December 14, 2010

Tag withdrawal symptoms...

Do you have them? Do you keeping going to your computer to see what the next tag is? Do you get out your inks, stamps and dies...look at them and think where are the instructions? Tim's tags were so much fun, and with such easy simple instructions, meant we had our creativity given to us for 12 days! Bliss! I copied as faithfully as I could..not because I am a copycat but because I wanted to see if I could! Now I am taking the best bits and creating some of my own tags..keeping in the Christmas spirit! Did you know it is only 11 days to Christmas? I haven't sent any cards, done the minuscule amount of Christmas shopping..not decided what we are having for Christmas dinner yet (it is just the two of us.. that's a day in my pj's, I think!!! lol) and I still have to find a real tree ( we always do real!) that isn't going to make the bank manager have a heart attack!!
So I am going to try to blog a new tag everyday (Jennie style! lol) and here is the first one! here I used the crackle paint effect on the Snowman die. I embossed the tag with the Tall Pines, and coloured with distress inks, added a branch or two from the bare tree, which I covered liberally with Picket Fence Distress Stickles ( I allowed it to dry overnight to get maximum effect) . Added a bit of Dabber paint to his hat , a flowing Tartan scarf, voila Jen's Tag no 1!

Want to join me ? let me know if you are up for it, and I will add a linky to the blog ,-edited: I have added a linky at the top of my blog.. just add your tags :)) for stash giveaway! If I make 11 tags it will be a miracle!! lol  I am going to enter this in my own challenge over on The Creative Team blog too!
Have a creatively tagful day!
 

Sunday, November 14, 2010

41 Days to Christmas

I have been royally told off about counting days lol, so in my final card for the week,  I am showing you one of my favourite techniques first shown by Wendy Vecchi on her blog, which I have used time and time again! This technique is fiddly, and you need the patience of Job to do it, but boy the results are stunning!  Firstly you need the Rosette die, and I do have some more coming in stock next week, so you can pre-order by emailing me if you wish. Cut 7 rosettes,( I used the Retro Grunge Papers) and make them slightly different widths by cutting off the straight edge. Then gather them up so they are in a half rosette and secure one of the little rounds to the folded edge. This is quite a difficult bit as they spring apart, but with patience you can do it! Cut half of the round off when dry.You will end up with 7 little pleated skirts in ascending sizes. I didn't get time to photograph, so there are no step by steps. I edged all the elements in gold dabber.
I covered the card in different size stickers from the Seasonal Stickers , but you could easily use the new Seasonal Papers. Stick the tree elements onto the card using glossy Accents ( the mini bottles are in stock now!) . Add a star to the top of the Tree!

Old fashioned, and reminding my DH of Christmas's past ... he has asked for this card for himself!!!
This is the final card in my collection, and I have kind of got into making them this year, so more may come out of this marathon!!
Have a great Sunday, and be Creative!
Hugs


Tuesday, July 27, 2010

Love of my Life!

Great song, and a great challenge set by Hels this week on Sunday Stampers. I took a mini canvas, some stamps, Tim's Heart and wings die ( first time used! lol), and some Ten Seconds Studio metal, and put together this little piece.
I cut the heart out of a piece of reddish material and backed it with some card, and stuffed it with cotton wool..couldn't find my stuffing.. nothing unusual in that !!. I edged it in gold dabber, and did the same with the canvas. The canvas is painted with Claudine's paints in Modern Red. The little crown and wings were cut out in gold metal, added a little bit of red dabber to them, and ran through the embossing folders.
I hope it qualifies!
Thank you Hels for the challenge :))
Happy Creating!

Tuesday, June 29, 2010

Bring your bucket and spade!

Lots of sun, travels, work, and the fact that there has been no time to create, meant this little journal/artbook page has been sadly neglected since I first painted the page with yellow spray paints about a week ago! I wanted it to be summery, and reflect the lovely weather we are having, but time eluded me, and finally after all the glue had set, I could finish it! Here is my recipe for it.
Method: paint the bare pages in mica sprays or paints. Add lots of PVA glue to lashings of silver sand. Ice the page with it! Add starfish and shells. Let it dry. Use dabbers to paint the sea, and sky. While wet add white Accent enamels. Allow to dry. Add more for brighter whites! sounds like an advert for washing clothes!!! Draw your words with Dimensional Pearls.
Brush the loose sand off your desk, and remember your bucket and spade for making sandcastles!!
P.S. Don't forget the candy on offer this week:)
Hugs

Thursday, December 17, 2009

Christmas comes but once a year

and I love giving stuff away, so today is no exception! Yesterday a few people commented on the card that was on my desk, and I thought I would show you a couple of versions of it, and giveaway BLOG CANDY too!
I used the small Father Christmas on the Mini Christmas Plate 1, and stamped him in Black Archival ink on a piece of chipboard or mountboard. . Then I carefully inked him and the surrounding card in Distress inks. The actual card was stamped using Gold Dabber on Tim Holtz's Fabulous Flourishes, allowed to dry and then distress inked over the gold. Make sure that you clean your stamp off thoroughly after using dabber as it dries and then is impossible to remove! I then carefully dabbed off the distress ink off the gold paint. It gives a great subtle effect. You should try it, so simple.


I would love to give someone the chance to use the Mini Christmas Plate
 
from all the comments I get between now and Monday. If you post it on your blog too, you can get an extra go in the draw! I will even trow in some gold dabber , some Kling-On cushioning and a Christmas Card too from me!
Don't forget the Tagtastic Blog Candy too , but you have to have done at least one tag!
Good luck to everyone, and I will post worldwide too!
Hugs

Thursday, October 22, 2009

Dib Dab dob!

I know what a terrible title, but I was wondering did you get them out and try them.. the dabbers that is? Here are the two final tags, and we start with the letter T for wood effect. This is one of the techniques I learnt while at Ranger, and it is fab for distressed looks, and backgrounds and in this case a tree.
With a dragging movement flick your chosen colour dabber across the tag using up, down movements. Do not fill the whole tag, just random swipes. Allow to dry.
Take a darker colour distress ink, and ink over all the tag. Mist with water a cloth or paper towel, and wipe all over the tag. The distress ink will be removed from where the dabbers are, and voila! you have a wood effect.
I stamped the tree and birds over in the same colour distress ink, and the T was coloured in with the same colour dabber and highlighted with distress ink.

Fo rthe final letter E I used a gold dabber, and just stippled it all over the tag. Add more a nd build up the layers to create a fab hammered look. This is my attempt at Halloween, and the skulls come from the Mini Grungeboard. In fact all the grungeboard is covered in silver dabbers, and the skulls with black dabber. E for eeek???? lol

I have had great fun showing you these techniques, and if it has inspired you I am happy!
Have a Creative Day!

Wednesday, October 21, 2009

Dab a dab doo time!

Here is the second post on using those dabbers you have lurking in the drawer! It seems from the comments that most of you do have a dabber or two, and just don't use them! Shame, as they are wonderful products, and of course are in all the Adirondack colours too.
Today the letter E means Embossing! I stamped and embossed on a black chipboard tag in clear embossing powder.  Mix some colours of dabber on your non stick craft sheet, and using a piece of cut n dry dab all over the image and to the edges of the tag. I used gold. Allow to dry. Do NOT heat dry it, as the embossing will melt! When it is dry, spray some water from a mini mister onto a cloth, and gently dab away the dabber colour from the embossing. You will be left with a shabby chic look. This is the neatest and probably my favourite of the techniques. The grungeboard letter was dabbed in silver and gold.

A is for Crackle Glaze.. ok I now know I can't spell!! This technically isn't a dabbed piece , but you certainly can use Dabbbers on it. It kind of slipped into the set. Here I distress inked the tag with reds, and spritzed it with water. I then stamped onto it with one of Mr Holtz's bird stamps, using a darker distress ink. . If you wanted you could ink your stamp up with dabbers, and stamp as normal. Be sure that you clean the stamp with water immmediately, as it  will dry into the stamp and is more difficult to remove. I then distress crackled the entire tag with Rock Candy distress crackle paint. I love this product and have got through a couple of bottles already! A definite must for the craft box!!


I realised that the bird is on his side, and so even if I turn the tag picture, the A will be the wrong way round....I told you that sometimes I complete mess up, and this is one of those occasions! I will show the last two tomorrow, and if you have been inspired to get out those dabbers, and get messy, please show me, I always love to see.
Have a dab dabber do time!

Tuesday, October 20, 2009

Do you dab?

Over the weekend at Stamp Addicts I demoed Dabbers and Distress inks, and distress stickles and Grungeboard. To show some of the techniques, I made a set of chipboard tags, and I thought I would show you and explain some of the techniques over the next couple of days.
I used the word CREATE to do 5 tags..
C is for pearl! I know I cannot spell! 
Here I mixed Pearl Dabber and Pool Dabber on a craft mat and using Cut N Dry Foam, mixed them together and swooshed over the tag. Allow to dry naturally, although you can heat dry it. The effect, which gives a  fabulous pearly effect, does not show up on the scan sadly :( I used the same colours on the Grungeboard Letter and rubbed off the excess adding a little tiny bit of denim too. The stamp was inked in cobalt archival, and well I just had to add a grungepaper flower!! what else do you expect!

R-means masking .. bet you didn't know that! See I told you I couldn't spell! Here I have stamped the tag in The Artistic Stamper dots background using cobalt archival ink, and then laid on top one of Tim's Idea-ology mini masks. Using the same technique of putting some dabber colours on a craft mat, this time Pool and Aqua, I dabbed them over the mask moving the mask when it was dry. Make sure you clean the mask off thoroughly when you have finished. The Dabbers are water soluble, so water on a cloth works well.  The grungeboard letter was distressed inked in Faded Jeans and I rubbed Weathered Wood stickles over it.

A little tip make sure you shake the dabbers well before use, and if they are slightly dry them add water from a spritzer to them. These are techniques and not perfect pieces of art, and tomorrow I will show you letters A and E , that's Art and Embossing...lol
Have a Dabber of a Day ( sorry couldn't help it!)

Friday, January 30, 2009

ABC....

I made this piece for Lots to Do challenge when really I should have been working on new stamp designs! The challenge was to make a piece including a frame in the artwork. I used an Ikea wooden Frame, and white crackled painted it, then wiped over it with black Adirondack ink. I used White and Black Dabber on the Grungeboard Alphas , then sanded off the black ones and inked the white ones. It wouldn't quite fit in through the back, I guess I should have measured it first before I out the letters on (doh!), so I put it on the front, and I think it works really well! The paper behind is from one of my favourites-Black Market-Ebony & Alabaster.
Black and white seems to be my favourite colour scheme at the moment along with blue, LOL!

Sunday, January 25, 2009

40th Birthday Card

Today is a friend's 40th birthday! and I made a card! Well me being me, it is a card with a difference! She didn't want any presents, so I incorporated the pressie into the card. Often I will go out of the house to wander down our small town to get inspiration, and think! So, I had a wander and went to a couple of shops to try to find inspiration. I visited one of my favourite shops Heselden Hats , where Teresa, the owner sells hats amongst fabulous finds! I often come away with a carrier bag full of great stuff. Yesterday was no exception. A FREE bag of little handmade envelopes, some handmade paper envelopes, and a bag full of broken jewellery bits! All for £1.50! Heaven!
So did I get inspiration...? no, but I did get an idea, and I made a Black and White card using Grungeboard Numerals, Thickers letters and a piece of Stampbord!
I used black and white Papers for the background ( don't ask me who as I have no idea!) , and I used Snow Cap dabber on the Grungeboard, and then swiped Archival Black ink over them, and the thickers letters too! For the stampbord, I ultra-thicked it in white , and then using black stazon, inked the girls into it while the Utee was still hot. You get the faces in relief. One of my favourite techniques. I actually added a brooch back to the Stampbord, and attached the brooch through 2 large holes onto the front of the card.
Voila!